Tub Drain Assembly Repair

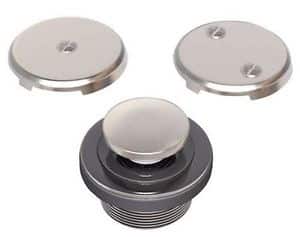
Toe-operated drain plug
 ♦There comes a time when every drain assembly needs to be replaced, say the experts at Duncan plumbing. The reason could be that the finish on the assembly has deteriorated, or the linkage is broken, or you want to make an aesthetic change from chrome to polished brass.
For this type of job, you will need to get to the area beneath the tub because most of the work involves removing and replacing drain pipes and other fittings, according to your local Santa Cruz plumber. This is a good time to replace old cast iron with plastic drain pipes. The first step is to remove the trip waste and the existing drain.
Plumber Pro Tip of the Week
Tip #1 Begin by unscrewing the two screws that secure the cover plate. Pull the linkage from the overflow tube – the plate, lift wire, and coil or stopper is all connected, so they should come out all at once. They may be covered with a mat of hair and soap scum.
Tip #2 If there is a pop-up stopper in place, remove it. Then unscrew the drain fitting by inserting the handles of a set of pliers into the drain opening, and engage the crosspiece at the bottom of the drain fitting. Grip the pliers with an adjustable wrench, and turn counterclockwise to unscrew the fitting.
Tip #3 If the fitting won’t budge, move to the underside of the tub. Located between the drain shoe and the tub is a rubber gasket. Use a hacksaw blade to cut through the gasket and the drain spud. You can also use a reciprocating saw with a metal-cutting blade.
Tip #4 The P-trap will be the only thing holding the overflow tube in place, now. You may be able to loosen the trap’s friction nut and lift everything out at once. This depends on how long it has been here. Loosen the nuts that hold the waste and overflow components together, and remove the components piece by piece.
Tip #5 Place plumber’s putty around the underside of the new drain’s flange – and begin the installation of the new drain. Remember to clean the surface very well with a putty knife. Remove any debris you find, you want the best possible deal you can get so you do not have any future leaks.
Tip #6 You may need a helper working from below. They will place the rubber gasket on the drain shoe and hold the shoe up to the tub’s drain outlet. Thread the fitting into the shoe. Insert pliers handles into the drain opening; grip with an adjustable wrench, and turn until excess putty squeezes out and the fitting feels snug. “Righty-tightly”, so turn clockwise this time.
Tip #7 Install the rubber gasket on the bathtub overflow tube, and into a waste T-fitting. Now, slide the tube upward into the wall cavity from below. Again, a helper could be handy at this step, as well.
Tip #8 Join the drain and overflow pipes in the drain T-fitting and then tighten all the nuts using large groove-joint pliers.
Tip #9 Install the brass tailpiece that connects the drain system to the plastic drainage pipe. It will be a tight fit, so try pulling the plastic trap down far enough to get the tailpiece in position. Apply a light coat of pipe joint compound on the threads of the tailpiece, and turn the tailpiece into the bottom of the T-fitting.
Tip #10 Slip the compression nut and washer onto the tailpiece; insert the tailpiece into the trap riser, and tighten the nut to secure the tailpiece in the trap riser. (Riser’s go vertically, rather than horizontally.)
Tip #11 From inside the tub, slip the linkage into the overflow tube until the cover plate sits against the tube’s gasket. Have patience, you may have to wiggle the part slightly. Secure the plate. Finished!
PLUMBING TRADE SECRETS: If your tub drain has a pop-up plug and lever, feed them into the drain hole with the trip lever in the open position. If your drain has a screen, install it now.
Not every plumbing need, needs a plumber!
We Take Care of All Your Plumbing Needs.
Request Service


